Use the steps to add or modify support teams and support team members.
Start at step 4 if you want to work only with support team members.
Note: Users are allowed to create a support team only if both Allow ATM
Configuration and Allow Customer Support Configuration
are selected in Profile & Preferences.
-
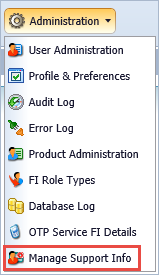
Select
Manage Support
Info from the Administration menu.
-
If you have access to more than one
financial institution, select a financial institution (FI), and then click Go.
The following screen appears where you can choose to configure
support teams and support team members.
-
Click
 Support Teams to create or modify a support team.
The following screen appears showing a list of the existing support teams
for the selected institution.
Tip: Select Export to Excel or
Export to CSV to
export the data in the grid.
| Option |
Description |
|---|
| To create a support team: |
- Select Create Team.
- Fill out the following fields:
- Name
- This field contains the name of the support team.
- Region
- This field contains the time zone region in which the support
team is located.
- Locale
- This field contains the location of the support team.
- Workday Begins/Ends
- These fields contain the time that the workday begins and
ends for the support team in hh:mm
format.
- Default Notification Addresses - E-Mail/Pager E-Mail
- These fields contain the email and pager email addresses where
notifications should be sent. Select Test to send a
test email to the entered address.
- Event Escalation - Number of Retries/Time Between
Retries
- These fields contain the number of retries that it took for
the email notifications to be sent to the entered email address and the time
between retries in hh:mm
format.
- Select Save to save the new support team or
Cancel to cancel the creation of the new support team.
- A confirmation window appears where you must select Yes
to confirm your choice or No to be redirected back to the
Create Team screen with the previously entered
details.
|
| To modify a support team: |
- Select a team by clicking the button next to the desired team.
- Select Modify Team.
- Modify the team information as desired.
- Select Save.
- Select Yes to save your changes.
Tip: Confirmation screens appear within the Modify function
in the same manner as they do when creating a support team.
|
-
Click
 Support Team Members to create or modify support team
members.
The following screen appears showing a list of the existing support team members for
the selected institution.
Tip: Select Export to Excel or Export to
CSV to export the data in the grid.
| Option |
Description |
|---|
| To create a support team member: |
- Select Create Member.
- Fill out the following fields:
- Name
- This field contains the name of the support team member.
- Team
- This field contains the time zone region in which the support team member
is located.
- Locale
- This field contains the location of the support team member.
- Enabled
- Select this box if the team member is active.
- On-Duty Schedule
- Select the days of the week that the team member is
on-duty.
- Workday Begins/Ends
- These fields contain the time that the workday begins and
ends for the support team member in hh:mm
format.
- Notification Addresses - E-Mail/Pager E-Mail
- These fields contain the email and pager email addresses where
notifications should be sent. Select Test to send a
test email to the entered address.
- If Member Is Unavailable - Stand-In Member
- This field contains the stand-in member that is to be contacted if the
selected team member is unavailable.
- Select Save to save the new support team member or
Cancel to cancel the creation of the new support team
member.
- A confirmation window appears where you must select Yes
to confirm your choice or No to be redirected back to the
Create Member screen with the previously entered
details.
|
| To modify a support team member: |
- Select a team by clicking the button next to the desired team member.
- Select Modify Member.
- Modify the team member information as desired.
- Select Save.
- Select Yes to save your changes.
Tip: Confirmation screens appear within the Modify function
in the same manner as they do when creating a support team member.
|


 Support Teams to create or modify a support team.
The following screen appears showing a list of the existing support teams for the selected institution.
 Tip: Select Export to Excel or Export to CSV to export the data in the grid.
 Support Team Members to create or modify support team
members.
The following screen appears showing a list of the existing support team members for the selected institution.
 Tip: Select Export to Excel or Export to CSV to export the data in the grid.